Preventative engine maintenance 101 (or How to keep your engine happy!)
Check the oil
Why?
Your engine is a precision machine with lots of moving parts. When you have moving parts you get friction. Think about rubbing your hands together very fast, what happens. Friction causes heat and also wear. Heat dries out rubber seals. These are the forces you are fighting against.
Your engine has a couple of defenses against these forces. Oil and coolant. See this post regarding coolant. In this installment we’re going to check the oil.
What’s needed:
- Shop towels or rags
- Optional: nitrile gloves
- 1 quart of oil (appropriate viscosity for your vehicle)
- Owners manual
How to:
- Start by parking your vehicle on a flat surface and turn it off.
- Then take a few minutes to gather the above items.

Hood release lever
- Find the hood release. (Usually on the left side of the steering column. Maybe on the lower part of the dash or on the kick panel.) licitly HINT: After pulling the hood release the hood still won't open. This is intentional. It's a safety feature to keep the hood from flying up when your going down the highway.
- Find and disengage the safety release under the front edge of the hood. Some go left or right and some push up. The owners manual should have some specifics on how to accomplish this.
- Open the hood and if there is a hood prop put it up. If there is no hood prop, make sure that the springs or struts are adequate to hold up the hood. We wouldn't want the hood to make an untimely descent onto your head or fingers.
- If the struts or springs are inadequate find something strong enough to hold up the hood temporarily. Make sure it is installed in a way that it won't slip and let gravity take the hood to its closed position with your body parts in its path. Georgīevka NOTE: If the hood struts are bad make a note to order some new ones. If you have questions on where to get good inexpensive ones contact me and I can help you find ones that will keep you safe when working under the hood.
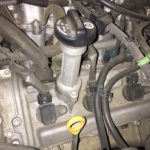
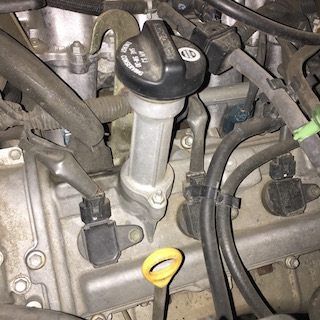
Yellow Loop dipstick handle.
- Once you have the hood open we're going to find the engine oil dipstick. Usually there is some sort of loop on the end of it. Most late model cars have this dipstick loop brightly colored. Again, this is where your owners manual may come in handy. If you can't find it contact me and I'll do my best to help you locate it.
- Grab a rag in one hand and pull the dipstick out with the other hand. The last inch or two will have oil on it, and this first time out we'll just wipe the oil off and stick the dipstick back in.
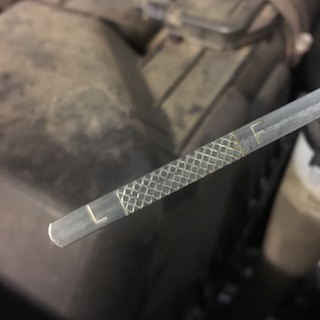
- Pull the dipstick a second time and hold the middle of it with the paper towel. At the end of the dipstick there will be some marks that denote full and usually a one quart low mark.

Dipstick gauge (F - full, L - one quart low)
- If the oil level is below the full mark then you will have to add some.
- Next we'll look for the oil fill location. This usually looks like the picture and has information on the type of oil that the manufacturer specifies for your vehicle. (see the picture in step 7)
- Open it up and using a funnel install the amount that your vehicle lacks. NOTE: If you have to add some oil you will need to wait a few minutes for the oil to completely drain down to the oil pan.
- You can then recheck the dipstick.
Now you know how to check the condition and level of your oil.